news
2021.1.8
The defects of die casting parts are closely related to the structure of die casting parts and design of the die casting pouring system process plan. Only by satisfying a reasonable structure and an excellent pouring plan, can die casting products with a high pass rate be manufactured. An oil pan that integrates the oil filter and the compressor bracket installation part has thick hot spots in the filter part, and internal shrinkage has led to the defect of low airtight pass rates of products. In this article, we present process design solution to internal defects of die casting aluminum alloy oil pans, we explain some specific implementation methods for solving the shrinkage and porosity problems in this area.
1. Analysis of the original structure of die castings and die casting defects
The engine oil pan is matched with a 1.5T turbocharged engine. In order to lighten the engine and make the model compact and beautiful, the oil cooler and filter are installed in series on the oil pan to shorten the width of the left and right ends of the engine and decrease the layout volume of the cylinder block, make oil-way sample, reduce oil pressure drop and have convenient maintenance. At the same time, considering the wheel train layout problem, the air-conditioning compressor is installed on the oil pan and cylinder block, so that the wheel train wrap angle can meet the design requirements. Therefore, the oil pan integrates the oil filter and compressor bracket mounting threaded holes.
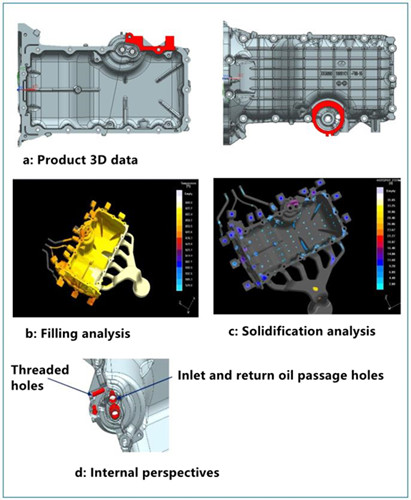
Fig. 1 The original product design and process pouring plan of the oil pan:

The average wall thickness of the oil pan is 3.0mm except for the thick parts, which is a thin walled part. The marked area filter shows that the installation plane and crankcase joint surface processing area are wider in the Figure 1-a. See the red area. Magmasoft software filling simulation analysis is shown in Figure 1-b. High-speed filling is very easy to produce enveloping air, and the risk of subcutaneous gas porosity is very high due to machining exposure. The filter installation part has a complex structure and a great wall thickness difference, and there is a hot spot with insufficient final solidification and feeding. The solidification simulation analysis of Magmasoft software is shown in Figure 1-c. The shrinkage porosity of the hot spot is located between the oil hole and the screw hole. The oil filter installation part is close to the oil passage hole and threaded hole. The internal perspective is shown in Figure 1-d. They are all located in thick and large parts. The air tightness test of the finished product has a very high risk of leakage caused by shrinkage porosity.
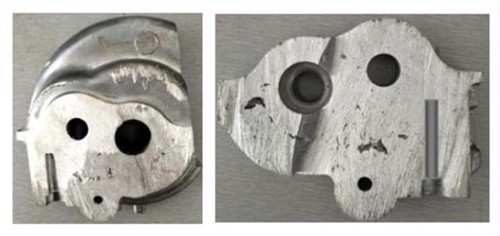
Fig. 2 The anatomy inspection:

The aluminum alloy die casting process pouring program was developed rapidly as described above without product design optimization changes due to the needs of the development of the oil pan project. After the T1 sample mold trial, the internal shrinkage porosity on the die cast is very serious after anatomy inspection, as shown in Figure 2. A leakage test is taken after machining. In Figure 1-d, the inlet and return oil passage holes are ventilated at 350kpa. The balanced air pressure is taken, and there is a serious leak between the oil hole and the threaded hole. The anatomy picture 1-a shows that the sealing machining surface has different degrees of gas porosity defects, which directly leads to the airtightness of the product, and they were unqualified and scrapped. The rapid molding confirmed that the analysis conclusion of the potential casting defects in the early stage of development was accurate.
2. Solutions
2.1 Optimizing and changing the casting structure
According to the previous analysis, the die casting defects of the developed mold samples are caused by the internal shrinkage caused by the thick and large hot spots of the filter. The first thing to consider is to design the weight reduction grooves in the thick and large parts to reduce the thick and large parts and the width of the processing surface.
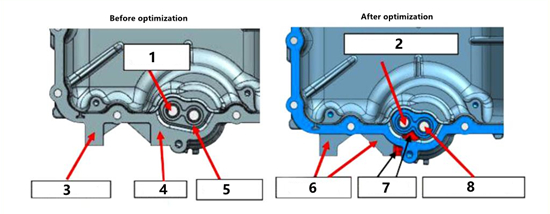
Because machining removes the dense layer on the outermost surface of the aluminum alloy die casting, internal defects are exposed on the inner surface of the oil hole and threaded hole after the dense layer being removed for the machining allowance. And the shrinkage cavity between the holes forms a leak. The method is to increase the diameter of the casting hole, change the oil hole to a non machining hole, reduce the machining allowance for the bottom hole of the screw hole and minimize the damage to the dense layer of the casting hole surface by the machining. At the same time, the processing area is reduced for the cylinder body and the sealing surface, avoiding the risk of exposing gas porosity on the processing surface, as shown in Figure 3.
Fig. 3 A comparison of before and after product optimization:

1.The oil hole being the machined hole
2.Changing the oil return hole to a non machined hole
3.The boss being the machined surface
4.The thick part
5.The oil hole being the machined hole
6.Surface reduction is non processing
7.Adding a weight reduction slot
8.Changing the oil inlet hole to a non machine
After the rapid mold is optimized and changed, the gas porosity in the crankcase joint surface have been effectively resolved. By strengthening the high-pressure point cooling of the hot joint, the surface of the mold core at this part is coated to prevent the hot joint from sticking to the mold, and the airtight pass rate has been improved to a certain extent, but there are still about 15% of the airtight inspection unqualified products. Only after infiltration can the technical requirements of the air tightness test of the finished product be met. Product optimization and modification of molds have made a certain contribution to the improvement of defects. Although the pass rate of airtightness after infiltration can reach about 98%, completely solving the leaks caused by shrinkage porosity defect of the part is still an urgent technical breakthrough based on the consideration of mass production infiltration cost and quality hidden dangers.
2.2 Optimization of gating systems
Through the optimization and improvement of the product structure of the rapid mold, the pass rate has improved, ensuring the needs of project verification during the pre-development period. In the small batch production process of rapid molds, the process experience of rapid mold development was summarized and analyzed. It was concluded that the wall thickness of the oil pan cavity was 3.0mm and was prematurely solidified, and the defective part was at the end of the pouring, filling and feeding. The feeding channel was blocked, which leads to shrinkage porosity on the thick parts of the filter. Air entrainment at the filling end is inevitable. Porosity and shrinkage holes coexist at the same time, which affects the improvement of the internal quality of this part which is processed by aluminum alloy die casting service.
In summary, the use of single side pouring methods of the rapid mold is not conducive to the feeding of the thick parts of the distal filter. How to increase the cross-sectional area of the feeding channel, shorten the length of the feeding path, achieve an excellent feeding effect and reduce the enveloping air at the end of the filling is a key measure to solve the shrinkage porosity defect in this part. Therefore, when designing the mass production mold, the pouring method of the casting system of the product was totally changed. By analyzing the thick cross section with a width of 12mm and a length of 8.0mm(an area of 96mm², fig.4-a) of the joint surface of oil pan crankcases, adopting two sides pouring can use this cross section to form an excellent feeding channel, and add an auxiliary pouring gate on the side of the thick part of the filter section to solve the gas entrainment in thick and large section feeding channel in the filling process. This can avoid the defects of shrinkage cavity caused by insufficient feeding and gas entrainment in the filling. The Magmasoft software filling simulation analysis for pouring plan of the die casting process of the mass production mold is shown in Figure 4-b.
Fig. 4 Optimization of the gating system:

a: Thick sections of crankcase joint surfaces
b: Simulation analysis of mass production mold filling
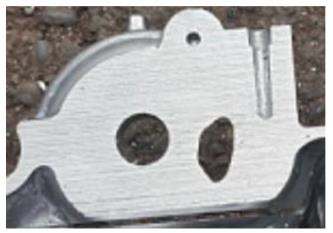
The mass production mold is developed according to the pouring scheme in Figure 4-b. Meanwhile, enhance the process cooling measures of this part, respectively implement high-pressure point cooling for the screw holes and oil hole inserts and the mold core with reduced wall thickness is optimized according to the insert structure. The mold test verified that there is no filling flow mark at the distal end, and the casting is well formed. The thick part is well fed, and the section inspection is performed. The aluminum die casting internal gas shrinkage cavity is effectively solved. After machining, the 350kpa balance air pressure test shows that there is no leakage in this part, and the pass rate has been greatly improved. See Figure 5.
Fig. 5 Sectional sections after the parameters being changed:

3. Summary
Facts have proved that in the development of aluminum die casting processes, the first step is to improve the structure of the casting, and maximize the uniform wall thickness to reduce weight and wall thickness. The oil pan is optimized through product design, and the weight is reduced by 50g, which eliminate the thick hot spot of the casting structure. In the process design of the gating system, various mold flow analysis software is used to identify rationality of the filling path of the molten metal, and whether the position and angle of the pouring gate effectively form an effective feed with the shrinkage porosity part. The judgment of the feeding channel is not limited to the location, length and cross-sectional area of the runner and gate. Similarly, make good use of the structural characteristics of the casting to form a good feeding and overflow channel in the aluminum die casting cavity to ensure solidification in feeding sequence in the cooling process of the casting. Reducing the difference in solidification time of each area is an important tec.
